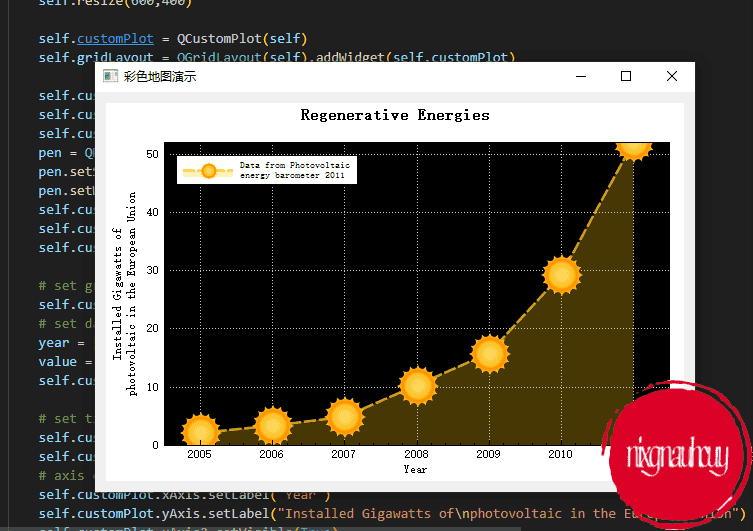
Pyqt QCustomPlot 简介、安装与实用代码示例(二)

完整代码我已经上传到 Github 上了,可前往 https://github.com/nixgnauhcuy/QCustomPlot_Pyqt_Study 获取。
完整文章路径:

前言

继上文,继续补充官方示例 demo 实现~

实用代码示例

彩色图演示

A 2D color map with color scale. Color scales can be dragged and zoomed just like axes

1
2
3
4
5
6
7
8
9
10
11
12
13
14
15
16
17
18
19
20
21
22
23
24
25
26
27
28
29
30
31
32
33
34
35
36
37
38
39
40
41
42
43
44
45
46
47
48
49
50
51
52
53
54
55
56
57
58
59
60
61
62
63
64
import sys, math

from PyQt5.QtWidgets import QApplication, QGridLayout, QWidget
from QCustomPlot_PyQt5 import QCustomPlot, QCPAxis, QCPColorScale, QCPColorMap
from QCustomPlot_PyQt5 import QCPColorGradient, QCPMarginGroup, QCP, QCPRange

class MainForm(QWidget):

def __init__(self) -> None:
super().__init__()

self.setWindowTitle("彩色地图演示")
self.resize(600,400)

self.customPlot = QCustomPlot(self)
self.gridLayout = QGridLayout(self).addWidget(self.customPlot)

# configure axis rect:
self.customPlot.setInteractions(QCP.Interactions(QCP.iRangeDrag | QCP.iRangeZoom)) # this will also allow rescaling the color scale by dragging/zooming
self.customPlot.axisRect().setupFullAxesBox(True)
self.customPlot.xAxis.setLabel("x")
self.customPlot.yAxis.setLabel("y")

# set up the QCPColorMap:
self.colorMap = QCPColorMap(self.customPlot.xAxis, self.customPlot.yAxis)
nx = 200
ny = 200
self.colorMap.data().setSize(nx, ny) # we want the color map to have nx * ny data points
self.colorMap.data().setRange(QCPRange(-4, 4), QCPRange(-4, 4)) # and span the coordinate range -4..4 in both key (x) and value (y) dimensions
# now we assign some data, by accessing the QCPColorMapData instance of the color map:
x, y, z = 0, 0, 0
for xIndex in range(nx):
for yIndex in range(ny):
x, y =self.colorMap.data().cellToCoord(xIndex, yIndex)
r = 3*math.sqrt(x*x+y*y)+1e-2
z = 2*x*(math.cos(r+2)/r-math.sin(r+2)/r) # the B field strength of dipole radiation (modulo physical constants)
self.colorMap.data().setCell(xIndex, yIndex, z)
# add a color scale:
self.colorScale = QCPColorScale(self.customPlot)
self.customPlot.plotLayout().addElement(0, 1, self.colorScale) # add it to the right of the main axis rect
self.colorScale.setType(QCPAxis.atRight) # scale shall be vertical bar with tick/axis labels right (actually atRight is already the default)
self.colorMap.setColorScale(self.colorScale) # associate the color map with the color scale
self.colorScale.axis().setLabel("Magnetic Field Strength")

# set the color gradient of the color map to one of the presets:
self.colorMap.setGradient(QCPColorGradient(QCPColorGradient.gpPolar))
# we could have also created a QCPColorGradient instance and added own colors to
# the gradient, see the documentation of QCPColorGradient for what's possible.

self.colorMap.rescaleDataRange()

# make sure the axis rect and color scale synchronize their bottom and top margins (so they line up):
marginGroup = QCPMarginGroup(self.customPlot)
self.customPlot.axisRect().setMarginGroup(QCP.msBottom|QCP.msTop, marginGroup)
self.colorScale.setMarginGroup(QCP.msBottom|QCP.msTop, marginGroup)

# rescale the key (x) and value (y) axes so the whole color map is visible:
self.customPlot.rescaleAxes()

if __name__ == '__main__':
app = QApplication(sys.argv)
mainForm = MainForm()
mainForm.show()
sys.exit(app.exec())

散点像素图演示

Pixmap scatter points and a multi-lined axis label, as well as a plot title at the top

1
2
3
4
5
6
7
8
9
10
11
12
13
14
15
16
17
18
19
20
21
22
23
24
25
26
27
28
29
30
31
32
33
34
35
36
37
38
39
40
41
42
43
44
45
46
47
48
49
50
51
52
53
54
55
56
57
58
59
60
61
62
63
import sys

from PyQt5.QtWidgets import QApplication, QGridLayout, QWidget
from PyQt5.QtGui import QPen, QColor, QFont, QBrush, QPixmap
from PyQt5.QtCore import Qt

from QCustomPlot_PyQt5 import QCustomPlot, QCPTextElement, QCPScatterStyle, QCPGraph

class MainForm(QWidget):

def __init__(self) -> None:
super().__init__()

self.setWindowTitle("散点像素图演示")
self.resize(600,400)

self.customPlot = QCustomPlot(self)
self.gridLayout = QGridLayout(self).addWidget(self.customPlot)

self.customPlot.axisRect().setBackground(QColor(0, 0, 0))
self.customPlot.addGraph()
self.customPlot.graph().setLineStyle(QCPGraph.lsLine)
pen = QPen(QColor(255, 200, 20, 200))
pen.setStyle(Qt.DashLine)
pen.setWidthF(2.5)
self.customPlot.graph().setPen(pen)
self.customPlot.graph().setBrush(QBrush(QColor(255,200,20,70)))
self.customPlot.graph().setScatterStyle(QCPScatterStyle(QPixmap("./tmp.png")))

# set graph name, will show up in legend next to icon:
self.customPlot.graph().setName("Data from Photovoltaic\nenergy barometer 2011")
# set data:
year = [2005, 2006, 2007, 2008, 2009, 2010, 2011]
value = [2.17, 3.42, 4.94, 10.38, 15.86, 29.33, 52.1]
self.customPlot.graph().setData(year, value)

# set title of plot:
self.customPlot.plotLayout().insertRow(0)
self.customPlot.plotLayout().addElement(0, 0, QCPTextElement(self.customPlot, "Regenerative Energies", QFont("sans", 12, QFont.Bold)))
# axis configurations:
self.customPlot.xAxis.setLabel("Year")
self.customPlot.yAxis.setLabel("Installed Gigawatts of\nphotovoltaic in the European Union")
self.customPlot.xAxis2.setVisible(True)
self.customPlot.yAxis2.setVisible(True)
self.customPlot.xAxis2.setTickLabels(False)
self.customPlot.yAxis2.setTickLabels(False)
self.customPlot.xAxis2.setTicks(False)
self.customPlot.yAxis2.setTicks(False)
self.customPlot.xAxis2.setSubTicks(False)
self.customPlot.yAxis2.setSubTicks(False)
self.customPlot.xAxis.setRange(2004.5, 2011.5)
self.customPlot.yAxis.setRange(0, 52)
# setup legend:
self.customPlot.legend.setFont(QFont(self.font().family(), 7))
self.customPlot.legend.setIconSize(50, 20)
self.customPlot.legend.setVisible(True)
self.customPlot.axisRect().insetLayout().setInsetAlignment(0, Qt.AlignLeft | Qt.AlignTop)

if __name__ == '__main__':
app = QApplication(sys.argv)
mainForm = MainForm()
mainForm.show()
sys.exit(app.exec())

官方 demo 的背景图我没有,随便用黑色底了,太阳 logo 也没有,随便找了一个,效果一样就行~

实时数据演示

Real time generated data and time bottom axis

1
2
3
4
5
6
7
8
9
10
11
12
13
14
15
16
17
18
19
20
21
22
23
24
25
26
27
28
29
30
31
32
33
34
35
36
37
38
39
40
41
42
43
44
45
46
47
48
49
50
51
52
53
54
55
56
57
58
59
60
61
62
63
64
import sys, math, random

from PyQt5.QtWidgets import QApplication, QGridLayout, QWidget
from PyQt5.QtGui import QPen, QColor
from PyQt5.QtCore import Qt, QTime, QTimer

from QCustomPlot_PyQt5 import QCustomPlot, QCPAxisTickerTime

class MainForm(QWidget):

def __init__(self) -> None:
super().__init__()

self.setWindowTitle("实时数据演示")
self.resize(600,400)

self.lastPointKey = 0

self.customPlot = QCustomPlot(self)
self.gridLayout = QGridLayout(self).addWidget(self.customPlot)

self.customPlot.addGraph()
self.customPlot.graph(0).setPen(QPen(QColor(40, 110, 255)))
self.customPlot.addGraph()
self.customPlot.graph(1).setPen(QPen(QColor(255, 110, 40)))

timeTicker = QCPAxisTickerTime()
timeTicker.setTimeFormat("%h:%m:%s")
self.customPlot.xAxis.setTicker(timeTicker)
self.customPlot.axisRect().setupFullAxesBox()
self.customPlot.yAxis.setRange(-1.2, 1.2)

# make left and bottom axes transfer their ranges to right and top axes:
self.customPlot.xAxis.rangeChanged.connect(self.customPlot.xAxis2.setRange)
self.customPlot.yAxis.rangeChanged.connect(self.customPlot.yAxis2.setRange)

# setup a timer that repeatedly calls MainWindow::realtimeDataSlot:
self.curTime = QTime.currentTime()
self.dataTimer = QTimer(self)
self.dataTimer.timeout.connect(self.realtimeDataSlot)
self.dataTimer.start(0) # Interval 0 means to refresh as fast as possible

def realtimeDataSlot(self) -> None:
# calculate two new data points:
key = self.curTime.msecsTo(QTime.currentTime())/1000.0

if key-self.lastPointKey > 0.002: # at most add point every 2 ms
# add data to lines:
self.customPlot.graph(0).addData(key, math.sin(key)+random.random()*1*math.sin(key/0.3843))
self.customPlot.graph(1).addData(key, math.cos(key)+random.random()*0.5*math.sin(key/0.4364))
# rescale value (vertical) axis to fit the current data:
# self.customPlot.graph(0).rescaleValueAxis()
# self.customPlot.graph(1).rescaleValueAxis(True)
self.lastPointKey = key

# make key axis range scroll with the data (at a constant range size of 8):
self.customPlot.xAxis.setRange(key, 8, Qt.AlignRight)
self.customPlot.replot()

if __name__ == '__main__':
app = QApplication(sys.argv)
mainForm = MainForm()
mainForm.show()
sys.exit(app.exec())

多轴演示

Multiple plot styles with different key/value axes and pi tick labeling at top axis

1
2
3
4
5
6
7
8
9
10
11
12
13
14
15
16
17
18
19
20
21
22
23
24
25
26
27
28
29
30
31
32
33
34
35
36
37
38
39
40
41
42
43
44
45
46
47
48
49
50
51
52
53
54
55
56
57
58
59
60
61
62
63
64
65
66
67
68
69
70
71
72
73
74
75
76
77
78
79
80
81
82
83
84
85
86
87
88
89
90
91
92
93
94
95
96
97
98
99
100
101
102
103
104
105
106
107
108
109
110
111
112
113
114
115
116
117
118
119
120
121
122
123
124
125
126
127
128
129
import sys, math, random

from PyQt5.QtWidgets import QApplication, QGridLayout, QWidget
from PyQt5.QtGui import QPen, QColor, QFont, QBrush
from PyQt5.QtCore import Qt, QLocale
from QCustomPlot_PyQt5 import QCustomPlot, QCPGraph, QCPScatterStyle, QCPTextElement, QCPAxisTickerPi, QCPErrorBars

class MainForm(QWidget):

def __init__(self) -> None:
super().__init__()

self.setWindowTitle("多轴演示")
self.resize(600,400)

self.customPlot = QCustomPlot(self)
self.gridLayout = QGridLayout(self).addWidget(self.customPlot)

self.customPlot.setLocale(QLocale(QLocale.English, QLocale.UnitedKingdom)) # period as decimal separator and comma as thousand separator
self.customPlot.legend.setVisible(True)

legendFont = self.font() # start out with MainWindow's font..
legendFont.setPointSize(9) # and make a bit smaller for legend
self.customPlot.legend.setFont(legendFont)
self.customPlot.legend.setBrush(QBrush(QColor(255,255,255,230)))
# by default, the legend is in the inset layout of the main axis rect. So this is how we access it to change legend placement:
self.customPlot.axisRect().insetLayout().setInsetAlignment(0, Qt.AlignBottom|Qt.AlignRight)

# setup for graph 0: key axis left, value axis bottom
# will contain left maxwell-like function
self.customPlot.addGraph(self.customPlot.yAxis, self.customPlot.xAxis)
self.customPlot.graph(0).setPen(QPen(QColor(255, 100, 0)))
self.customPlot.graph(0).setLineStyle(QCPGraph.lsLine)
self.customPlot.graph(0).setScatterStyle(QCPScatterStyle(QCPScatterStyle.ssDisc, 5))
self.customPlot.graph(0).setName("Left maxwell function")

# setup for graph 1: key axis bottom, value axis left (those are the default axes)
# will contain bottom maxwell-like function with error bars
self.customPlot.addGraph()
self.customPlot.graph(1).setPen(QPen(Qt.red))
self.customPlot.graph(1).setLineStyle(QCPGraph.lsStepCenter)
self.customPlot.graph(1).setScatterStyle(QCPScatterStyle(QCPScatterStyle.ssCircle, Qt.red, Qt.white, 7))
self.customPlot.graph(1).setName("Bottom maxwell function")
errorBars = QCPErrorBars(self.customPlot.xAxis, self.customPlot.yAxis)
errorBars.removeFromLegend()
errorBars.setDataPlottable(self.customPlot.graph(1))

# setup for graph 2: key axis top, value axis right
# will contain high frequency sine with low frequency beating:
self.customPlot.addGraph(self.customPlot.xAxis2, self.customPlot.yAxis2)
self.customPlot.graph(2).setPen(QPen(Qt.blue))
self.customPlot.graph(2).setName("High frequency sine")

# setup for graph 3: same axes as graph 2
# will contain low frequency beating envelope of graph 2
self.customPlot.addGraph(self.customPlot.xAxis2, self.customPlot.yAxis2)
blueDotPen = QPen(QColor(30, 40, 255, 150))
blueDotPen.setStyle(Qt.DotLine)
blueDotPen.setWidthF(4)
self.customPlot.graph(3).setPen(blueDotPen)
self.customPlot.graph(3).setName("Sine envelope")

# setup for graph 4: key axis right, value axis top
# will contain parabolically distributed data points with some random perturbance
self.customPlot.addGraph(self.customPlot.yAxis2, self.customPlot.xAxis2)
self.customPlot.graph(4).setPen(QPen(QColor(50, 50, 50, 255)))
self.customPlot.graph(4).setLineStyle(QCPGraph.lsNone)
self.customPlot.graph(4).setScatterStyle(QCPScatterStyle(QCPScatterStyle.ssCircle, 4))
self.customPlot.graph(4).setName("Some random data around\na quadratic function")

# generate data, just playing with numbers, not much to learn here:
x0 = [3*i/25.0 for i in range(25)]
y0 = [math.exp(-x*x*0.8)*(x*x+x) for x in x0]
self.customPlot.graph(0).setData(x0, y0)

x1 = [3*i/15.0 for i in range(15)]
y1 = [math.exp(-x*x)*(x*x)*2.6 for x in x1]
y1err = [y*0.25 for y in y1]
self.customPlot.graph(1).setData(x1, y1)
errorBars.setData(y1err, y1err)

x2 = [i/250.0*3*math.pi for i in range(250)]
y2 = [math.sin(x*12)*math.cos(x)*10 for x in x2]
self.customPlot.graph(2).setData(x2, y2)

x3 = x2
y3 = [math.cos(x)*10 for x in x3]
self.customPlot.graph(3).setData(x3, y3)

x4 = [i/250.0*100-50 for i in range(250)]
y4 = [0.01*x*x + 1.5*(random.random()-0.5) + 1.5*math.pi for x in x4]
self.customPlot.graph(4).setData(x4, y4)

# activate top and right axes, which are invisible by default:
self.customPlot.xAxis2.setVisible(True)
self.customPlot.yAxis2.setVisible(True)

# set ranges appropriate to show data:
self.customPlot.xAxis.setRange(0, 2.7)
self.customPlot.yAxis.setRange(0, 2.6)
self.customPlot.xAxis2.setRange(0, 3.0*math.pi)
self.customPlot.yAxis2.setRange(-70, 35)

# set pi ticks on top axis:
self.customPlot.xAxis2.setTicker(QCPAxisTickerPi())

# add title layout element:
self.customPlot.plotLayout().insertRow(0)
self.customPlot.plotLayout().addElement(0, 0, QCPTextElement(self.customPlot, "Way too many graphs in one plot", QFont("sans", 12, QFont.Bold)))

# set labels:
self.customPlot.xAxis.setLabel("Bottom axis with outward ticks")
self.customPlot.yAxis.setLabel("Left axis label")
self.customPlot.xAxis2.setLabel("Top axis label")
self.customPlot.yAxis2.setLabel("Right axis label")

# make ticks on bottom axis go outward:
self.customPlot.xAxis.setTickLength(0, 5)
self.customPlot.xAxis.setSubTickLength(0, 3)

# make ticks on right axis go inward and outward:
self.customPlot.yAxis2.setTickLength(3, 3)
self.customPlot.yAxis2.setSubTickLength(1, 1)

if __name__ == '__main__':
app = QApplication(sys.argv)
mainForm = MainForm()
mainForm.show()
sys.exit(app.exec())

对数轴演示

Logarithmic axis scaling. Note correct display of the sine function crossing zero in negative infinity

1
2
3
4
5
6
7
8
9
10
11
12
13
14
15
16
17
18
19
20
21
22
23
24
25
26
27
28
29
30
31
32
33
34
35
36
37
38
39
40
41
42
43
44
45
46
47
48
49
50
51
52
53
54
55
56
57
58
59
60
61
62
63
64
65
66
67
68
69
70
71
72
73
74
75
76
77
78
79
80
81
82
83
84
85
86
87
88
89
90
91
92
93
94
95
96
97
import sys, math

from PyQt5.QtWidgets import QApplication, QGridLayout, QWidget
from PyQt5.QtGui import QPen, QColor, QBrush
from PyQt5.QtCore import Qt
from QCustomPlot_PyQt5 import QCustomPlot, QCPGraph, QCPGraphData, QCP, QCPAxis, QCPAxisTickerLog

class MainForm(QWidget):

def __init__(self) -> None:
super().__init__()

self.setWindowTitle("对数轴演示")
self.resize(600,400)

self.customPlot = QCustomPlot(self)
self.gridLayout = QGridLayout(self).addWidget(self.customPlot)

self.customPlot.setNoAntialiasingOnDrag(True) # more performance/responsiveness during dragging
self.customPlot.addGraph()
pen = QPen(QColor(255,170,100))
pen.setWidth(2)
pen.setStyle(Qt.DotLine)
self.customPlot.graph(0).setPen(pen)
self.customPlot.graph(0).setName("x")

self.customPlot.addGraph()
self.customPlot.graph(1).setPen(QPen(Qt.red))
self.customPlot.graph(1).setBrush(QBrush(QColor(255, 0, 0, 20)))
self.customPlot.graph(1).setName("-sin(x)exp(x)")

self.customPlot.addGraph()
self.customPlot.graph(2).setPen(QPen(Qt.blue))
self.customPlot.graph(2).setBrush(QBrush(QColor(0, 0, 255, 20)))
self.customPlot.graph(2).setName(" sin(x)exp(x)")

self.customPlot.addGraph ()
pen = QPen(QColor(0,0,0))
pen.setWidth(1)
pen.setStyle(Qt.DashLine)
self.customPlot.graph(3).setPen(pen)
self.customPlot.graph(3).setBrush(QBrush(QColor(0,0,0,15)))
self.customPlot.graph(3).setLineStyle(QCPGraph.lsStepCenter)
self.customPlot.graph(3).setName("x!")

dataCount = 200
dataFactorialCount = 21
dataLinear = [QCPGraphData() for i in range(dataCount)]
dataMinusSinExp = [QCPGraphData() for i in range(dataCount)]
dataPlusSinExp = [QCPGraphData() for i in range(dataCount)]
dataFactorial = [QCPGraphData() for i in range(dataFactorialCount)]
for i in range(dataCount):
dataLinear[i].key = i/10.0
dataLinear[i].value = dataLinear[i].key
dataMinusSinExp[i].key = i/10.0
dataMinusSinExp[i].value = -math.sin(dataMinusSinExp[i].key)*math.exp(dataMinusSinExp[i].key)
dataPlusSinExp[i].key = i/10.0
dataPlusSinExp[i].value = math.sin(dataPlusSinExp[i].key)*math.exp(dataPlusSinExp[i].key)
for i in range(dataFactorialCount):
dataFactorial[i].key = i
dataFactorial[i].value = 1.0
for k in range(1, i+1):
dataFactorial[i].value *= k

self.customPlot.graph(0).data().set(dataLinear)
self.customPlot.graph(1).data().set(dataMinusSinExp)
self.customPlot.graph(2).data().set(dataPlusSinExp)
self.customPlot.graph(3).data().set(dataFactorial)

self.customPlot.xAxis.grid().setSubGridVisible(True)
self.customPlot.yAxis.grid().setSubGridVisible(True)
self.customPlot.yAxis.setScaleType(QCPAxis.stLogarithmic)
self.customPlot.yAxis2.setScaleType(QCPAxis.stLogarithmic)
logTicker = QCPAxisTickerLog()
self.customPlot.yAxis.setTicker(logTicker)
self.customPlot.yAxis2.setTicker(logTicker)
self.customPlot.yAxis.setNumberFormat("eb") # e = exponential, b = beautiful decimal powers
self.customPlot.yAxis.setNumberPrecision(0) # makes sure "1*10^4" is displayed only as "10^4"
self.customPlot.xAxis.setRange(0, 19.9)
self.customPlot.yAxis.setRange(1e-2, 1e10)
# make range draggable and zoomable:
self.customPlot.setInteractions(QCP.Interactions(QCP.iRangeDrag | QCP.iRangeZoom))
# make top right axes clones of bottom left axes:
self.customPlot.axisRect().setupFullAxesBox()
# connect signals so top and right axes move in sync with bottom and left axes:
self.customPlot.xAxis.rangeChanged.connect(self.customPlot.xAxis2.setRange)
self.customPlot.yAxis.rangeChanged.connect(self.customPlot.yAxis2.setRange)

self.customPlot.legend.setVisible(True)
self.customPlot.legend.setBrush(QBrush(QColor(255,255,255,150)))
self.customPlot.axisRect().insetLayout().setInsetAlignment(0, Qt.AlignLeft|Qt.AlignTop) # make legend align in top left corner or axis rect

if __name__ == '__main__':
app = QApplication(sys.argv)
mainForm = MainForm()
mainForm.show()
sys.exit(app.exec())

结语

还剩下一些示例,待续篇更新!~